You more than likely understand the basics of version control and have an understanding of the Git Promotion Model, therefore you're ready to start and dive in using Git to learn more about its approach to version control, to find out why it has become such a popular version control system among software developers.
We will explore how to create a Git repository using the Terminal Window on Ubuntu Linux and we assume you already have Git installed on your desktop. You can follow along with this tutorial if you have Git installed and configured on Windows or Mac Osx, because for the most part the commands used in this tutorial are predominantly Git focused and will be the same on any operating system.
How to create a Git Repository on your local machine
There are two ways to create git repositories:
- Creating a new repository
- Cloning an existing repository
We're going to explore both approaches here and learn some of the interesting aspects of what happens when creating new repositories.
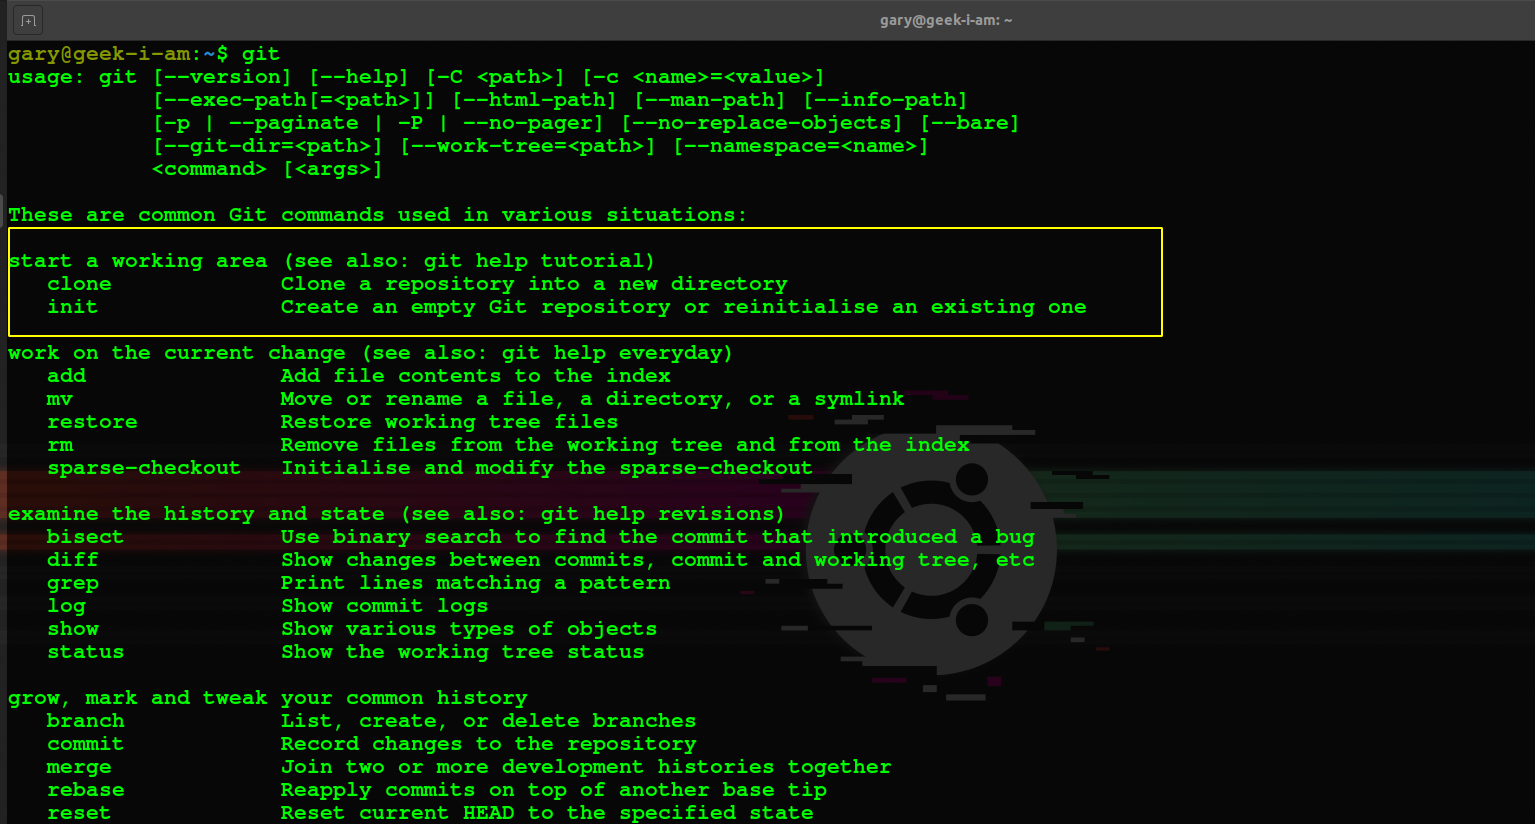
If we open our terminal window and immediately type the word git and press enter our system will respond with a list
of available commands, and you'll find the two commands to enable you to create a new git repository.

The git manual informs us that the two commands for creating working area in git are:
init- Creates an empty Git Repositoryclone- Clones an existing repository into a new directory
Create a new Git Repository with git init
We're going to create a new git repository on our desktop, you can name the project whatever you like, in my case I am
just going to call hello-geekiam-git so in the first instance I am going to create a new folder in my HOME directory
and name it hello-geekiam-git I will then change into the newly created directory
mkdir hello-geekiam-git
cd hello-geekiam-git
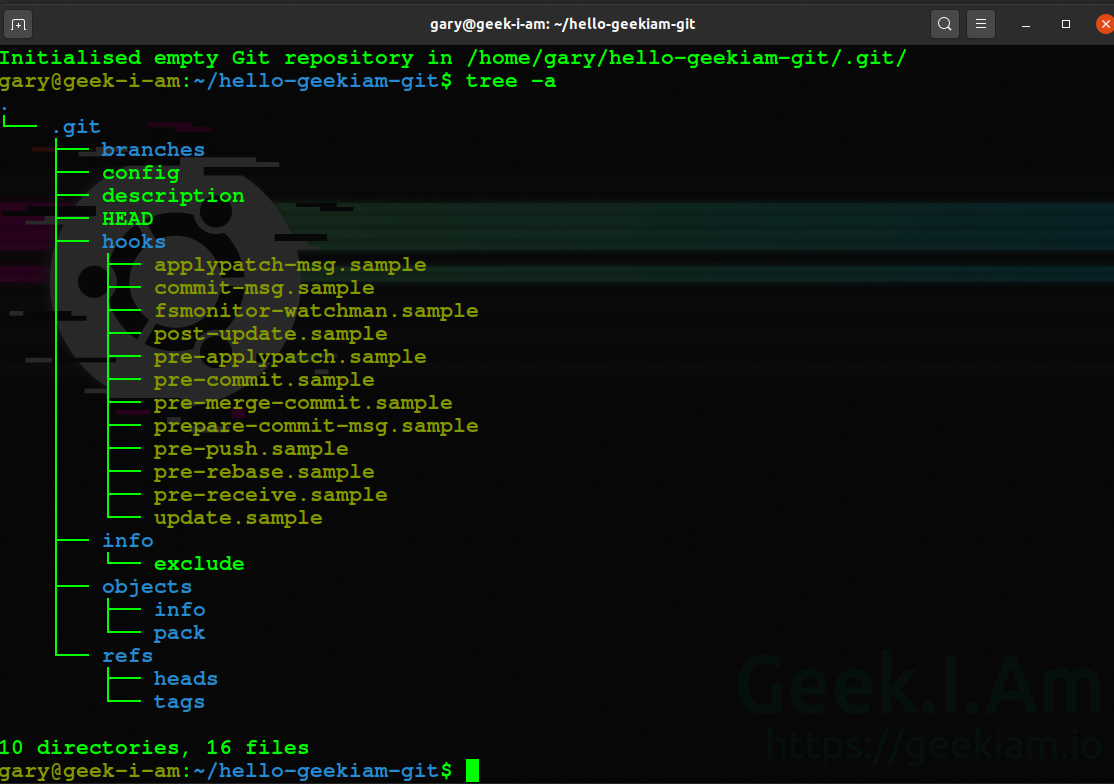
We can create our new git repository and all we have to do at this stage is use the command git init, your system
will respond that we have initialised an empty git repository and provide the location.

It's worth noting that although, we have created our git repository in a new empty directory you can just as easily create
a new git repository in a directory that already has a number of files and directories in it. All you need to remember when doing this
is that you need to run git init from the top most level directory you want to place under git control.
If we now take a look inside our directory, we'll notice that git has actually created a new hidden folder named .git
inside that folder there are a number of new files and folders

For the most part, you should never really concern yourself too much or even really need to understand exactly what is happening in this folder. In all likelihood you'll never actually ever need to edit or modify files in these folders. You should also keep in mind that if you ever delete any files or modify them directly you could actually end up corrupting your repository.
Now that our local repository has been created, we are still able to move our top level folder to any other location on the file system and not data or configuration changes will be lost. For instance, as you may recall I created my top level directory in the root of my home directory, but now say for instance I wanted to create a new folder in my home directory to contain several project related directories and files, but I wanted to move my git working directory to a another child directory within that directory, I could simply do by moving the entire folder without affecting any of my git configuration of that folder.
Additionally, we can create a repository locally and work with it whenever we want, even with no LAN or internet connection. We only need them if we want to share our repository with someone else, directly or using a central server.
Describing a git repository
You may have noticed that the .git directory contains a file named description which has been generated by git. This file
is used by git as a default way to know the name of the repository.
This file is usually ignored by web based Git repository services like Github and Gitlab, but it is used by few others like Gitweb.
The description file is important and used in several use cases
- It is the source of repository name for hooks
- hooks can be used to send email to contributions in case of a new commit and in the email,
the repository name can be placed.
This is the only file in the .git repository that you can edit manually. If you take a look at the content of the file
it typically has the following content
Unnamed repository; edit this file 'description' to name the repository.
You can edit this file with any of your favourite text editor and add any text you wish. I our case, we'll just add a simple description, using the following terminal command in the root of our working directory.
echo 'Geek.I.Am tutorial on how to use git' > .git/description
If we now use the cat command to view the content of the file we'll see our description we provided.
cat .git/description
However, if you're using Github or Gitlab you don't have to worry about any of this, because it is completely ignored.
Making local repository configuration changes
If you followed along in Git Advanced Configuration options
you've learned that Git has three levels of configuration scope, and inside this folder you would have noticed there is a config file,
this is where git will store is local configuration options.
We can edit the user name and email we want to use for this repository, if it is going to be different from the Global name and email we have configured. In my case I want to edit this to supply different credentials just illustrate how we could potentially change values.
I want to configure my user name to be Geek.I.Am Tutorials and my email to be tutorials@geekiam.io to do this I can
use the following git commands and set my configuration scope to local
git config --local user.name "Geek.I.Am Tutorials"
git config --local user.email "tutorials@geekiam.io"
If we view our config file in our .git directory now, we'll see that our changes have been saved. We'll also see some
additional settings that are specific to our local repository.
[core]
    repositoryformatversion = 0
    filemode = true
    bare = false
    logallrefupdates = true
[user]
    email = tutorials@geekiam.io
    name = Geek.I.Am Tutorials
The details of the these settings are not really important at this stage and for the most part of the Git Plumbing,
We have created our local git repository and can go ahead and add files, edit etc and commit them to the staging environment, we'll cover this process in detail Adding files to a git repository we could also configure our repository to connect to a remote repository, a process we discussed in How To Create A New Github Repository Using The Terminal
Clone an existing Git Repository
Probably the most common thing software developers will do, is download existing source code repositories to their
local machines in order to contribute to existing projects. This is the use case that is addressed by the clone command.
In Git Promotion Model we learned that a Remote Repository is a separate Git repository intended to collect and host content pushed to it from one or more local repositories. The remote repository's main purpose is to be a place to share and access content from multiple users.
The git clone is a little more complex command to use and there are a number of additional optional parameters one can apply when using it.
The syntax for the command is as follows:
git clone [--template=<template_directory>]
       [-l] [-s] [--no-hardlinks] [-q] [-n] [--bare] [--mirror]
       [-o <name>] [-b <name>] [-u <upload-pack>] [--reference <repository>]
       [--dissociate] [--separate-git-dir <git dir>]
       [--depth <depth>] [--[no-]single-branch]
       [--recursive | --recurse-submodules] [--] <repository>
       [<directory>]
In most use cases software developers will not use the majority of those parameters, and if fact for most will not even know that the command has that many optional parameters available.
When using the clone command you will typically specify the remote repository location to clone from and git will do the following:
- Create a local directory with the same name as the last component of the remote repository's path
- Create a
.gitsub-directory and copies the appropriate parts of the remote repository down to that.gitdirectory - Checks out the most recent version of a branch - usually the default master branch - into the local directory.
This checked-out version with the flat files is what the user usually sees and works with immediately after the clone.
The basic syntax for cloning a repository is git clone <url> where <url> is a path to a remote repository.
You can connect to a remote repository using either HTTPS or SSH, most developers will make use of SSH protocol.
In the following example we will clone the Geek.I.Am website repository to our local machine making use of SSH. In this case the remote repository we will be connecting to is on [Github](https://github.com/Geek-I-Am/website"Github Repository")
git clone git@github.com/Geek-I-Am/website.git
In seconds after running this command, a new directory will be created on your machine containing all the code in the the repository.
Conclusion
In this post we explored two ways of creating Git repositories by either creating new ones of cloning existing repositories. In future posts we will dive deeper in to these commands and even explore ways we may customise them to suit our common use cases.
