How to use package management in JavaScript projects
When developing software applications, it is considered good practice, to separate functionality into separate, interchangeable, isolated modules containing everything necessary to execute only the desired functionality.
In modular design, a software system, is decomposed into a collection is decomposed into a collection of modules that are relatively independent. Modules can take many forms, such as classes, sub-systems or services.
Modules are referred to by terminology across varying programming languages such as in .net, C++ they are called assemblies, or in languages such as Go, Dart, Java and JavaScript they are referred to as packages.
What is a package
A package is basically a folder that contains scripts that can be run and used by JavaScript applications, which is to say that any folder that has some JavaScript code could basically be considered package, also commonly referred to as a Module.
What is a Package Manager
Package managers enable Node and JavaScript developers to easily share and re-use code across projects as well as share packages and dependencies with other developers.
A package manager or package-management system is a collection of software tools that automates the process of installing, upgrading, configuring, and removing computer programs or modules for operating systems or software projects in a consistent manner.
Two of the most popular package management systems for JavaScript projects are
- NPM (Node Package Manager)
- yarn
What is npm
npm is a package manager for the JavaScript programming language. It is the default package manager for the JavaScript runtime environment Node.js. It consists of a command line client, also called npm, and an online database of public and paid-for private packages, called the npm registry.
npm can manage packages that are local dependencies of a particular project and globally-installed JavaScript tools.
When used as a dependency manager for a local project, npm can install, in one command, all the dependencies written and listed in the package.json file. Each dependency can specify a range of valid versions using the semantic versioning scheme, allowing developers to auto-update their packages while at the same time avoiding unwanted breaking changes.
npm also provides version-bumping tools for developers to tag their packages with a particular version and also provides the package-lock.json file which has the entry of the exact version used by the project after evaluating semantic versioning in package.json.
in March 2020 npm inc, the company behind npm was acquired by Github. GitHub plans to invest in npm’s infrastructure, with the hopes of bringing some much-needed modernisation to the platform
What is yarn
Yarn is a package manager for your code. It allows you to use and share code with other developers quickly, securely, and reliably. Yarn allows you to use other developers' solutions to different problems, making it easier for you to develop your software.
Yarn was developed by a collaborative effort including Facebook, Google, Exponent and Tilde. Its primary focus was aimed at solving a handful of problems experienced by software development teams when using npm:
- Installing packages wasn't fast and consistent enough
- Security concerns, due in part npm allowed packages to run code on installation.
How to install a node package manager
When installing node, npm is usually installed by default.
The following links offer great instructions on how to install Node using Node Version Manager
If you would like to start making use of yarn it will require you to install it on your system. Detailed instructions are available
I will cover installation on the two operating systems I use i.e. Ubuntu / Mac OSX
How to install Yarn on Ubuntu
curl -sS https://dl.yarnpkg.com/debian/pubkey.gpg | sudo apt-key add -
echo "deb https://dl.yarnpkg.com/debian/ stable main" | sudo tee /etc/apt/sources.list.d/yarn.list

sudo apt update && sudo apt install --no-install-recommends yarn
How to install yarn on Mac OSX
If you have Homebrew installed on your Mac OSX you can use it to easily install yarn. How to install Homebrew on Mac OSX
brew install yarn
npm vs yarn ?
The developers microcosm, often consists of differing opinions and preferences, which in almost all cases leads to tribalism. In some cases it can be difficult to get any two developers to agree on the same aspects of any given toolkit.
Developers will have different perspectives on which is the best software development language to use and there are different tribes revolving around Java, C#, Go, Python, JavaScript, Erlang, Haskell, Pascal etc. Even within those tribes they can be further broken to different tribes, for instance in the JavaScript community tribes form around the choice of Frameworks, Libraries, Language Versions, Editors, IDE's even whether Light or Dark themes on editors on editors and IDE's.
One has to also remember that like most things in software development, things are constantly evolving and changing. What used to an outstanding feature in one suddenly becomes an additional feature or implementation in another. What was yesterdays key advantage becomes tomorrows equivalent feature.
Communities constantly evolve, change and adapt. Package Managers make no exception and there are differing and conflicting opinions as to what makes a good or bad package management system.
A couple of years ago, Yarn had a few completely outstanding features that in some instances made it a good choice. However, npm has also continued to evolve and what used to be considered its weaker points have been addressed and some issues have been resolved.
I personally, don't really have any strong opinions which makes either a superior choice and I often found myself using either at any given time. Some projects I will use npm and others I will use yarn. I have been known to use both in the same project, but will admit this should be avoided as it can cause confusion.
At the end of the day, one should choose whichever Package Manager one feels most comfortable with, or failing that whichever Package Manager has been previously mandated by the project. I don't tend to lose too much sleep over my choice of package management system, I know others may actually stay up till the small hours of the morning debating the finer points of their choice on various social media platforms.
At the end of the day, they both preform and solve the same fundamental problem, and for the scope of this article we will focus on these basic issues and approaches using both.
What is the package.json
A package.json is a JSON format file which exists in the root of a Node/JavaScript project. The package.json file is a manifest of files and configuration for your project. It can do a lot of things and in some instances these could appear completely unrelated. Essentially all the metadata that is relevant to a project.
It's a central repository of configuration for tools, for example. It's also where npm and yarn store the names and versions for all the installed packages.
When it comes to package management the two important areas of the package.json file are:
dependenciessets a list of packages installed as dependenciesdevDependenciessets a list of npm packages installed as development dependenciesenginessets which versions of Node.js, npm or yarn this package works on.
How to create a package.json file
It is relatively easy task creating a package.json file using either yarn or npm, using either of the terminal commands.
### Create a package.json using npm
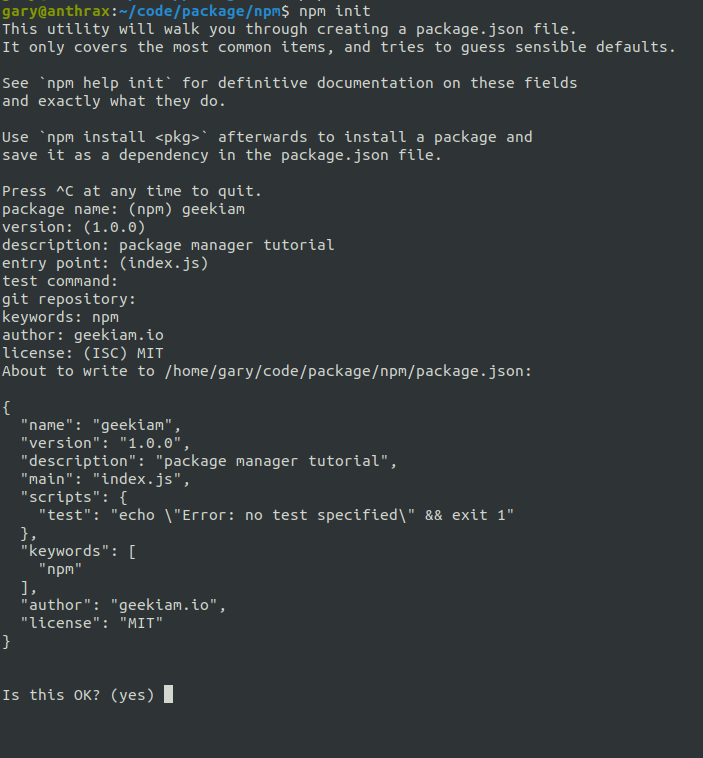
npm init

### Create a package.json using yarn
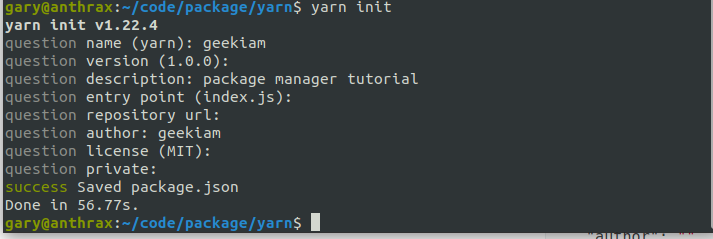
yarn init
Both will result in prompting you to answer various questions about the project you're about to start, by enabling you to provide some basic metadata.
npm init

yarn init

** Note: If you don't want to be prompted to answer questions and prefer to add the detail later you can use the -y switch
# Npm with the -y switch
npm init -y

# yarn with the -y switch
yarn init -y
Irrespective of which package manager you choose to create your package.json the end result will for the most part be the same. Both will result in generating a JSON format file that you will use to store your project dependencies and metadata.
{
  "name": "geekiam",
  "version": "1.0.0",
  "description": "package manager tutorial",
  "main": "index.js",
  "scripts": {
    "test": "echo \"Error: no test specified\" && exit 1"
  },
  "keywords": [
    "npm"
  ],
  "author": "geekiam.io",
  "license": "MIT"
}
It is well taking sometime to read the The package.json guide detailing What should you know about it, and what are some of the cool things you can do with it.
Depending on your project, the amount and type of metadata you'll want to add or edit will vary.
In the remainder of this post, I will be explicitly discussing some of the important items and additional configurations and properties that are important from a developer/DevOps perspective.
How to control version of node and package manager of your project
There may be a instances when you're developing a project, that you want to restrict developers who are collaborating with you on your project to only use a specific version of Node or package manager or you may want to ensure developers only use a specific package manager.
The engines property is a JSON object of key-value pairs that are used to specify the version of the libraries and run-times for the application to run optimally or depend upon.
You may use this property to specify the minimum or maximum version numbers node, npm or yarn required to run and to use to develop your application.
 "engines": {
        "node": "12.14.1",
        "npm": ">= 6.14.5",
        "yarn": ">= 1.22.4"
    }
You can also use this option with an additional file name .npmrc to restrict developers to use a specific package manager. The .npmrc enables us to specify package manager configurations and it is used by both npm and yarn.
In order to use the file, you will first need to create it in the root of your project folder.
touch .npmrc
This will create what is known as the npm-config, it is also worth reading more about the npm config files.
Once you done so you can open the file and add an additional property engine-strict and set it to true. npm will stubbornly refuse to install (or even consider installing) any package that claims to not be compatible with the current Node.js version.
   # .npmrc
engine-strict = true
If you are using Node Version Manager (nvm) to help you to easily switch between node version on your computer, you can also use another helpful utility to manage and control which version of node you application uses. This is super easy to create this file, and can simply be done by running the following command:
node -v > .nvmrc
This will create an additional file in the root of your project folder which will contain the version of number of node being used.

The content of the file will typically contain whichever version number is being used.
v12.14.1
This will enable developers who clone your repository from source control to easily set their environment to start working on your project by simply using
nvm use
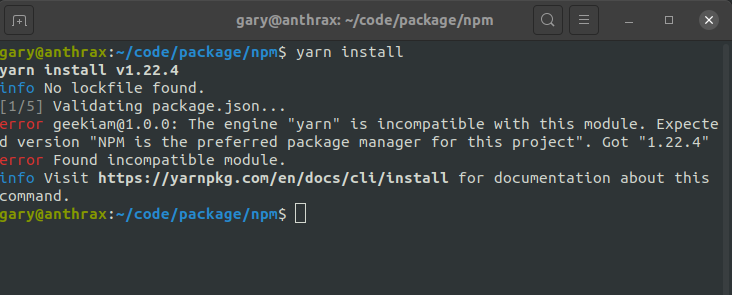
If you want to restrict the use of package manager to whichever is your preference, you can also simply update the engines your package.json to
"engines": {
    "node": "12.14.1",
    "npm": ">= 6.14.5",
    "yarn": "NPM is the preferred package manager for this project"
  },
Now when developers to use yarn install on your project they will receive an error message.

This will help to reduce the chance of errors caused by developers using different package managers and good practice to standardise the project’s coding rules and management.
Managing Dependencies
To specify the packages your project depends on, you must list them as dependencies or devDependencies in your package’s package.json file.
This will enable other developers to run npm install or yarn install to download all the dependencies that are listed in the package.json that meet the semantic version requirements.
dependencies- packages required for the production release of the applicationdevDependencies- packages only required for development and testing
To add a package to your dependencies is simple as using the following commands
## Add a package dependency with npm

npm install <package-name>

# or
npm i <package-name>

### Add a package using yarn

yarn add <package-name>
In both instance a new dependency will be added to your project. However, if you look into the root of your project directory you will also notice a new file will have been created depending on your package manager used
- npm == package-lock.json
- yarn == yarn.lock
what is the package-lock.json
Describes the exact versions of the dependencies used in an npm JavaScript project. If package.json is a generic descriptive label, package-lock.json is an ingredient table.
And just like how we don't usually read the ingredient table of a product (unless you are too bored or need to know), package-lock.json is not meant to be read line-by-line by developers, but usually only read by the NPM CLI tool to ensure reproduction of build environments for the project with npm ci.
What npm ci ?
npm ci is a command used by developers to consume the package-lock.json to download the exact version of each individual package the project depends on.
This helps to ensure that the projects context is perfectly replicated across environments.
What is yarn.lock
It is the yarn equivalent of the package-lock.json file and is also auto-generated.
The way to make use of this is to use the following command
yarn install --frozen-lockfile
Adding Development Dependencies
Development dependencies are packages that are not required for your application in production, but have either a development or quality assurance specific purpose.
These may include tools like Linters, Unit Testing Frameworks, Code Formatting etc.
To add a development specific dependency simply use the --save-dev switch o
## Adding Development dependency with npm
npm install <package-name> --save-dev

#or using the short hand
npm i <package-name> -D

## Add development dependency using yarn

yarn add <package-name> --dev
#or
yarn add <package-name> -D
When running npm install in the root of your project directory, it will by default install all the packages listed in both dependencies and devdependencies in your package.json
When deploying to production environments you typically want to run the npm install with the --production switch as this will only install the packages listed in the dependencies
# Install to production using npm
npm install --production

##install to production using yarn
yarn install --production
Additional flags for npm install
-Por--save-prodPackage will appear independencies-dor--savePackage will appear independencies-Dor--save-devPackage will appear indevDependencies-Eor--save-exactdependencies will be configured with an exact version rather than using npm’s default semver range operator--no-savePrevents saving to dependencies
Updating Dependencies
The package.json enables the tagging of dependencies to a range of versions. When installing dependencies with npm i or
yarn add the latest available version of the package is downloaded and store in the node_modules folder, and a
corresponding entry is added to the package.json.
{
  "dependencies": {
    "package-name": "2.0.0"
  }
}
Update patch releases
If you would like enable the installation of the latest patch version you can just update with~ and npm install
will install the latest version of those.
If versions 2.0.1 , 2.0.2, 2.0.3 are released then npm will install those. However, If 2.1.0 is released, it will not install that version, this is generally a good strategy as it may contain breaking changes.
{
 "dependencies": {
   "package-name": "~2.0.0"
 }
}
Update minor releases
If you like to enable updating to the latest minor version then update the prefix with ^
This will enable npm to update to most recent minor version increment. ^2.6.1 will match any 2.x.x release including
2.7.0, but will not install version 3.0.0.
{
 "dependencies": {
   "package-name": "^2.0.0"
 }
}
Explicit version range
You can use >, <, <=, >= to explicitly set the version range. Another good option for custom ranges or if you would
like to be explicit with your version ranges. The follow will install every version greater than or equal to 2.0.0 but
greater than 7.0.0:
{
  "dependencies": {
    "package-name": ">= 2.0.0 < 7.0.0"
  }
}
Always install the latest version
If you would like to ensure always installing the latest version of packages you can use the *
{
  "dependencies": {
    "package-name": "*"
  }
}
How to check package version
To check the NPM registry to see if your packages can be upgraded or if there are more current release versions
available for your packages, you can use the npm outdated command.
$ npm outdated
Package                       Current   Wanted   Latest  Location
eslint-plugin-vue             6.2.2    6.2.2     7.1.0   geekiam
gridsome-plugin-remark-shiki  0.3.1    0.3.1     0.5.0   geekiam
gridsome-plugin-tailwindcss   2.2.48   2.2.48    3.0.1   geekiam
wanted is the maximum version of the package that satisfies the semver range specified in package.json. If there's no
available semver range (i.e. you're running npm outdated --global, or the package isn't included in package.json),
then wanted shows the currently-installed version.
latest is the version of the package tagged as latest in the registry. Running npm publish with no special
configuration will publish the package with a dist-tag of latest. This may or may not be the maximum version of the
package, or the most-recently published version of the package, depending on how the package's developer manages the
latest dist-tag.
How to update packages
Use npm update to update all your dependencies to the latest minor or patch versions of packages.
Or npm update packagename anotherpackage to update specific packages to the latest minor or patch version.
Upgrading all packages
To update all packages to their latest major version, you can install an additional global package called
npm-check-updates.
npm i -g npm-check-updates
You can then run the command below in your project directory
ncu -u
This command will update your package.json file dependencies to the latest version. Once the command is complete it
will provide an overview of which packages have been updated and then you simply run
npm i to install all the updated packages.
