When developing web applications developers will frequently use terms like Front end and Back End to explain various aspects of the application. These terms are the fundamental building blocks of the application and are quite different to each other. Each layer needs to communicate and operate effectively with each other as a single unit.
Front End based development also commonly referred to as client side typically includes everything that users will directly experience when using the application which includes text colors, styles, images, graphs, tables, buttons, navigation menus etc. This typically provided making use of HTML, Cascading Style sheets (CSS) and Vanilla Javascript and Javascript based software development frameworks like Vue.JS and React etc.
Back end based development is typically server side aspect of the website which includes functionality like storing and retrieving data from various databases etc. It's the part of the website that users don't see and don't realise they are actually using. The backend services and functionality are enabled by making use of web based Application Programming Interface (API) which have been developed using software development programming languages and frameworks like PHP, C#, Java, Python, Go and even Javascript.
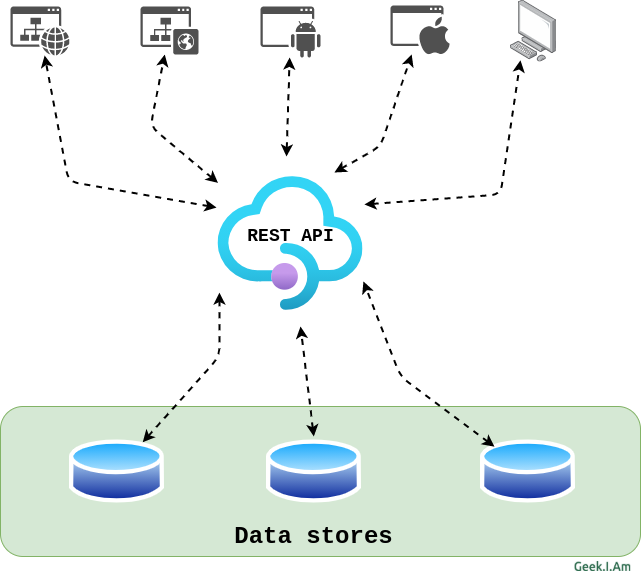
Communication between the Front and Back end of the application is typically enabled by making use of REST API, making use of commands utilising verbs like
- GET - retrieves data
- POST - send data
- PUT - Update an existing record
- DELETE - Removes a record
Rest based API's enable developers to build API layers for multiple applications to work with, often enabling different types of Front End applications i.e. Web, Mobile, Desktop and even Command Line applications to communicate with the same back end based services and data stores.

The data is transferred between the layers using either XML or JSON data payloads. Front end applications make use
of either XMLHttpRequest or the relatively new fetch API to request and transfer data from the backend API.
What is Fetch API
The Fetch API has been available in the Service Worker global scope since Chromium 40 based browsers, but has been enabled in the window scope in Chromium 42. The Fetch API is built into most modern browsers and there is often no need to include or import any additional libraries to make use of it.
The Fetch API is a simpler, easy-to-use version of XMLHttpRequest to consume resources asynchronously. Fetch lets you work with REST APIs with additional options like caching data, reading streaming responses, and more.
Fetch works using Promises, which makes it easy to write code to handle asynchronous requests.
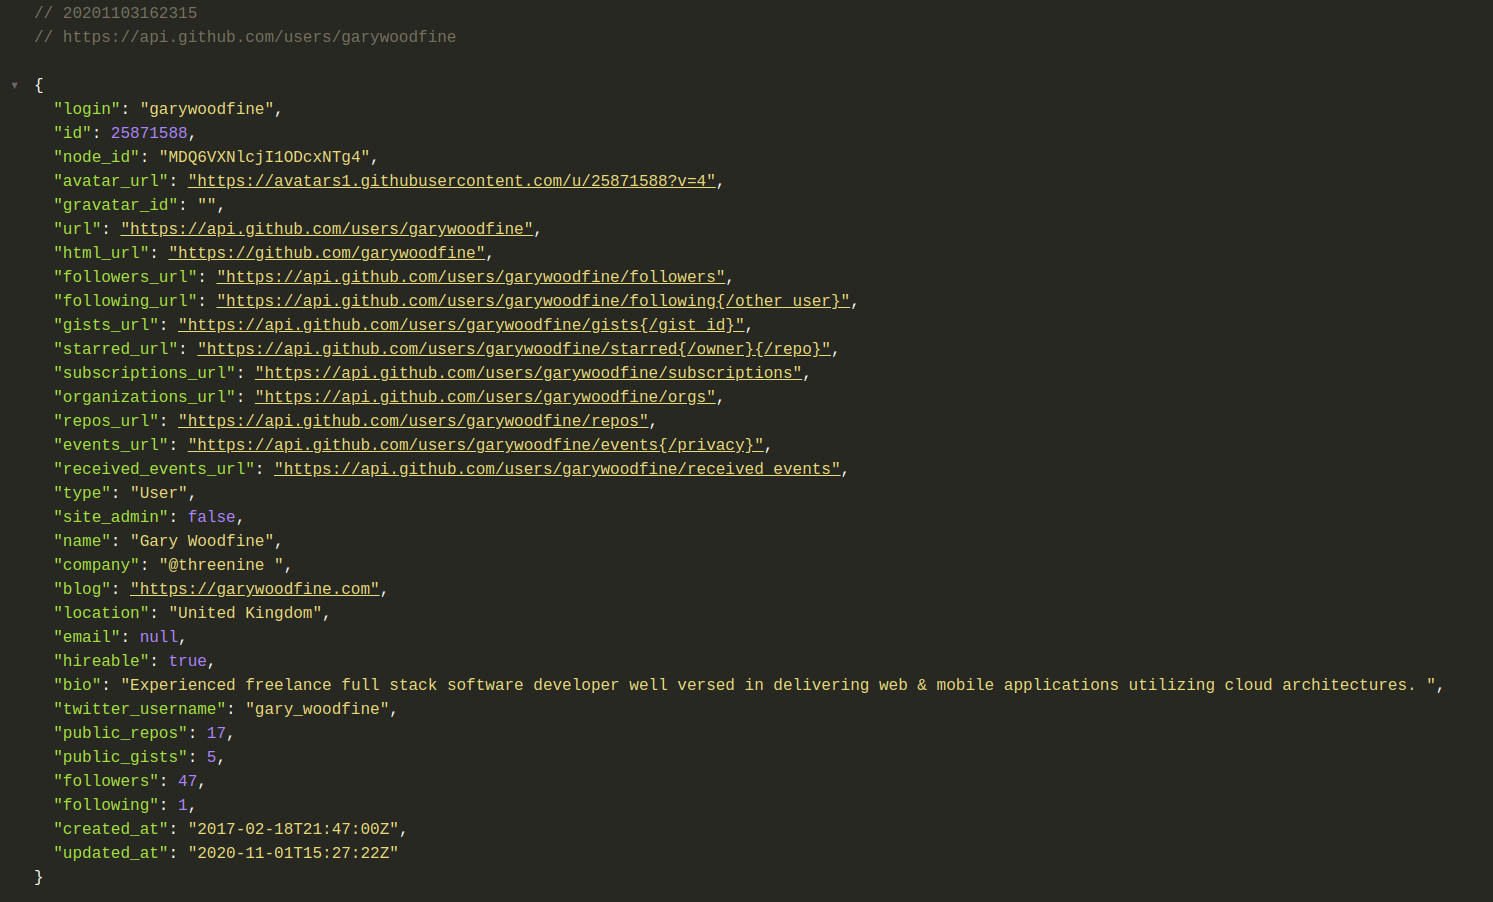
A basic fetch request to retrieve user data from the Github API may look like:
// GET Request.
fetch('https://api.github.com/users/garywoodfine')
   .then(response => response.json())  // convert to json
   .then(json => console.log(json))    //print data to console
   .catch(err => console.log('Request Failed', err)); // Catch errors
The first parameter of the Fetch function should always be the URL. Fetch can take an optional second JSON object which may contain options like method, headers, request body etc.
The Fetch response object contains information about the response object itself. This includes headers, status code, etc.
The res.json() function gets the data we need from the response object.

The Fetch API supports requests including:
- GET
- POST
- PUT
- PATCH
- DELETE
- OPTIONS
How to use Fetch API in Vue Components
We mentioned previously that the Fetch API is built into most modern browsers and therefore it makes it really easy to use the Fetch as you don't need to import or install any additional modules into your project.
<template>
  <div id="app">
    {{data}}
  </div>
</template>
<script>
export default {
  name: "App",
  data() {
    return {
      data: {}
    }
  },
  beforeMount(){
    this.getGithubUserDetail();
  },
  methods: {
     getGithubUserDetail(){

       fetch('https://api.github.com/users/garywoodfine')
          .then(response => response.json())
          .then(data => this.data = data);
    }
  }
};
</script>
The code above sends a HTTP GET from Vue to the Github API to retrieve User Information, this will be returned as a promise
therefore we need to convert the data returned to JSON, and then we can assign to our local variable to use.
How to use fetch GET request using async/await
The same code can be re-written making use of the async/await pattern as follows
<template>
  <div id="app">
    {{data}}
  </div>
</template>
<script>
export default {
  name: "App",
  data() {
    return {
      data: {}
    }
  },
  beforeMount(){
   await this.getGithubUserDetail();
  },
  methods: {
    async getGithubUserDetail(){
      const response = await fetch('https://api.github.com/users/garywoodfine');
      const data = await response.json();
      this.data = data;
    }
  }
};
</script>
The code above calls the same GET request from Vue using fetch, but makes use of an async function and the await
javascript expression to wait for the promises to return.
How to use fetch GET request with error handling
It is important to remember when working with Fetch API and the promises returned that you will not necessarily receive
error information regarding any API focused issues and therefore using .catch() . The fetch() function will
automatically throw an error for network errors but not for HTTP errors such as 4xx or
5xx responses.
In order to catch any HTTP errors, developers will need to check the response.ok property to see if the request
failed and reject the promise by calling return Promise.reject(error);. This approach means that both types of failed
requests - network errors and http errors - can be handled by a single catch() block.
<template>
 <div id="app">
   {{data}}
 </div>
</template>
<script>
export default {
 name: "App",
 data() {
   return {
     data: {}
   }
 },
 beforeMount(){
   this.getGithubUserDetail();
 },
 methods: {
    getGithubUserDetail(){

      fetch('https://api.github.com/users/garywoodfine')
         .then(response => {

            if(!response.ok) {
               const error = (data && data.message) || response.statusText;
               return Promise.reject(error);
            }
             response.json()
         })
         .then(data => this.data = data)
         .catch( error => {
         this.errorMessage = error;
         });
   }
 }
};
</script>
How to use fetch GET request with setting HTTP Headers
Some API requests will often require you to pass some additional information make use of HTTP Headers, for instance passing in Authentication tokens etc. You can do this by providing the detail to second optional parameter of the Fetch API.
<template>
  <div id="app">
    {{data}}
  </div>
</template>
<script>
export default {
  name: "App",
  data() {
    return {
      data: {}
    }
  },
  beforeMount(){
    this.getGithubUserDetail();
  },
  methods: {
     getGithubUserDetail(){

       fetch('https://api.github.com/users/garywoodfine', {
         headers: {
              Authorization: `token ${ process.env.GITHUB_TOKEN }`,
             },
        })
          .then(response => response.json())
          .then(data => this.data = data);
    }
  }
};
The above code adds additional header information to the get request to provide an authentication token the GitHub API request to avoid any throttling that Github enforces on unauthenticated requests.
How to use fetch to make a POST request
You can also use fetch API to make other requests. For instance, when developing applications you'll undoubtedly come across situations when you need to submit JSON data to the server. Typically, need to do this by making a POST request.
POST is the HTTP method that is designed to send data to a server from a specified resource. This method allows
data to be sent as a package in a separate communication with the processing script. This means that data sent through
the POST method will not be visible in the URL, as parameters are not sent along with the URI.
The format of an HTTP POST should have HTTP headers, followed by a blank line, followed by the request body. POST request can be used to submit a web form or upload a file, but it is critical to ensure that the receiving application resonates with the format being used. The Content-Type header indicates the type of body in the POST request.
In the example below we are going to post data to a Netlify function to post JSON data. We will be making use of the JavaScript Async/Await promise pattern
POST is NOT idempotent. So if you retry the request N times, you will end up having N resources with N different
URIs created on server.
Use POST when you want to add a child resource under a resource collection, always use POST for CREATE operations.
 let response = await fetch(`/.netlify/functions/users`, {
     method: 'POST',
     headers: {
         'Content-Type': 'application/json',
     },
      body: JSON.stringify(user),
    })
 return await response.json()
How to use fetch to make a PUT request
While both POST and PUT HTTP request methods seem to be sending data to a server inside the body, there is a key
difference between the two request methods.
PUT method is idempotent. So if you send a retry request multiple times, that should be equivalent to single request
modification.
Use PUT when you want to modify a singular resource which is already a part of resources collection. PUT replaces
the resource in its entirety, always use PUT for UPDATE operations.
Typically, the PUT requires an existing resource to update, so we need to pass the ID of the resource we need to
update as part of the Url string and in the body we supply the JSON with the data that needs to be updated
 // Pass the ID of the resource you want to update with a JSON body containing
 // the items you want to update
 let response = await fetch(`/.netlify/functions/users/123456`, {
     method: 'PUT',
     headers: {
         'Content-Type': 'application/json',
     },
      body: JSON.stringify(user),
    })
 return await response.json()
How to use fetch to make a DELETE request
DELETE operation is idempotent, resource is removed, gone forever. If you repeat the DELETE operation for that same resource, result will be same, “resource is deleted“. Response status is 200 ( OK ) for the first DELETE operation as his operation deletes the resource, for the successive DELETE operation response status will be 404 ( NOT FOUND ) as resource is already deleted by first DELETE operation.
Using the REST API you typically pass the Name of the Resource and its ID of what you would like to DELETE.
You should never use the delete method to delete any items from a resource collection, because the DELETE method is
only designed to remove the entire resource collection using the ID of the resource collection.
let response = await fetch(`/.netlify/functions/users/123456`, {
     method: 'DELETE',
     headers: {
         'Content-Type': 'application/json',
     })
 return await response.json()
Conclusion
The JavaScript Fetch API, is a huge improvement over XMLHttpRequest and provides a simple, elegant, and easy-to-use
interface. Fetch works great for fetching network resources.
The Fetch API is supported by all modern browsers, so there is no need to use any polyfill unless you want to support IE.
`
